It's hard to tell whether the people who are volunteering with me are having fun or not. They say they like the work, but am I just torturing them? Are they waiting until a convenient time when they can duck out? I will say, though, there is one activity that is fun for everyone. Regardless if a person is young or old, silly or serious, I have yet to hear of a person who does not enjoy demolishing walls. One volunteer describes it as her "daily zen." The handling of a crowbar, hitting it with as much force as possible against the plaster walls relieves stress levels and erases worry lines. Perhaps instead of botox injections, the stereotypical trophy wife should look to this activity to keep the life in her aging face!
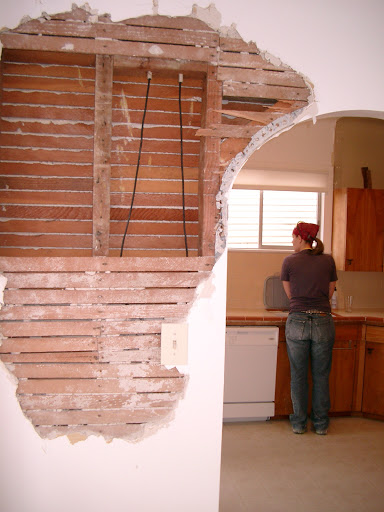
Step one to rehabbing a house is getting over the fact that you have to do more damage before things can be improved. It seems counterintuitive; doesn't destroying walls bring you farther away from the finished product? Actually, "demo" is a very needed process...it's the only way to truly know what's going on in your renovation project. Does it need to be insulated? Rewired? Are there leaks? Is there mold? All of this can be determined when taking down a wall.
Steps to correct and safe "demo":
Equipment needed: mask, safety goggles, hardhat (a must if you're doing ceilings), heavy boots to avoid stepping on nails, crowbar/sledgehammer
1. Remove trim by delicately prying it away from the wall. Remove nails with a nail puller--pull them out from behind and you will prevent the finish from being ruined.
2. Remove wall fixtures. TURN OFF POWER. Unscrew the screws that hold them and disconnect the attached wires. Once the wires are disconnected, put electrical tape or wire nuts over the bare ends of the wire before turning the power back on.
2. Remove plaster. If your wall is covered with plaster and lath, first knock the plaster off with a small sledgehammer or the butt end of the crowbar. If you're not totally ripping out the wall and you keep the lath on, you can go over it with 1/4-3/8" drywall. Works just fine and saves the time it would take to rip out the lath.
4. Remove lath. If you do decide to rip out the lath, by removing the plaster and lath separately, debris will be much easier to handle. You now have a wall that's completely down to the bare bones. If you want to totally get rid of it, you need to determine if it's load bearing or not and proceed from there...more on this later...
5. Clean up. Probably the most important part of a renovation other than safety is keeping your workspace clean. Shovel the plaster pieces into heavy-duty contractor bags and tie the lath together to make piles. You can either throw this in the garbage, or keep your feet toasty warm and use it as kindling for your fire!
Called up the power authorities that be and got my electricity turned on today. It was surprisingly easy, but I figure that's probably because they're expecting returns on investment...if they come and turn on the juice then they've just put another paying customer in their system. If you need the electricity turned on at your house all you have to do is:
1 Call the power supplier in your area, schedule a starting date so they can switch on your electricity (You do not have to be present when the guys come and turn it on)
2 Register where your bills are being sent to. If you're smart, the mailing address is to Barbados. Just kidding--paying bills is an important if  annoying part of home ownership, so make sure your address is correct so you can pay bills on time!
3 Before your system is put back online, MAKE SURE YOUR MAIN BREAKER IS SWITCHED OFF. This is the single most responsible, smart thing you can do in this situation, especially in older houses with shady wiring. You don't know where there are hidden cords and what connects to where, so better safe than having your house burn to the ground.
4 Test each and every outlet and light fixture. To do this, you must first locate which switches go to what portion of the house. Flip switches one at a time to on in the breaker panel, bring a partner to tell you what works and what doesn't. A good tool to use is a plug-in nightlight. You probably have one lying around, one of a seashell when you went on a trip to Cape Cod, or something perhaps a bit more embarassing. They're an easy, quick way to see if an outlet is working. Just plug in and you have your answer! Be sure to mark all fixtures and outlets that are not working so that you can return to them later to find out the problem...
1. Getting to know my house. We're going to be best friends for the next nine months that I am working full time on this project, so I'd better know it's likes/dislikes, wants/desires. The only way to understand a house is to walk in it and to be what my mother calls a "hungry noticer." Like that game Hungry Hungry Hippos, only not eating plastic white balls. Luckily I inherited the "hungry noticer" genes from her and so took it upon myself to document every part of the house. Problems, things I like, things I want to change, things that I want to like but most likely will change. I took a pencil, measuring tape, and a piece of paper. First things to go...Hideous 70s panelingRipped linoleum
Pumpkin orange wallpaper
Cracked Toilet
But these are minor changes. In the long run my vision is to open up the side entryway by ripping out a non load bearing wall and expanding the kitchen. This will make for a more communal space. Who doesn't want to gather in the kitchen?? It's where all the food is!
2. Finding Structural Problems. Ok, so this really should be first, but it's a scary subject so I like to think that it can be second. Nothing should really be done with the interior before any structural adjustments are made. This includes reframing/restructuring/resupporting, jacking the house if it's sinking, reroofing...basically anything that could allow for water damage or for the house to ultimately collapse. Yeah, pretty important.
 The structure of the house is remarkably sound. As my friend Kevin says, "these old houses are built with so many little pieces that it is very difficult to completely collapse the structure." Even if people cut support beams. My problem here lies in the back addition...the addition is attached to the front of the house with rafters. Unfortunately, the addition is sinking, pulling on the front of the house, making the house all out of whack. The first attempt to fix this will be to jack up the back of the house and see if I can realign the structure.
So I have a few leaks evident in my house, but it's difficult to tell whether they're new  or if they've been patched up. My guess is that someone attempted to patch up holes but did a pretty shoddy job. Call me crazy, but duct tape isn't going to be useful in this. It solves almost everything, but it doesn't solve the fact that I can see to the outside in places. Unfortunately I can't really do much until spring because I need to get onto the roof and check out the flashing, especially around the chimney (looks like swiss cheese it has so many holes!). I don't really want to be walking on an ice-laden roof...
Major Updates: I'm getting the electricity on tomorrow, so we'll see what works. Some rewiring will be necessary for sure, but it'd be nice to have a space heater to take out the chill. It's 25 degrees here and I'm freezing my little piggies off!
I
t's been a long time coming, but I finally have my deed! Silly, because I bought the house in October and am just getting license to enter...right in time for the coldest weather to hit. Imagine if I were moving into the house today--there is no way I could get the heat going on day one, even with a perfectly intact and up to date system! So I would have to suffer through a few nights of deathly cold! And that's assuming I didn't need to replace any radiators, boilers, etc. (which I probably will have to do). Perhaps the city needs to consider changing the time of the foreclosure auction to spring so that people have ample time to get their homes back online before the Buffalo winter hits?

Anyway, I took an initial look around and found...a MESS. The previous owners/renters left all their junk on the second floor, complete with year and a half old birthday cake! And the fridge? ...ew. I opened it to inspect and a round of gagging ensued. I spent an entire day just cleaning all the garbage out so now I can actually start the huge task of rehabbing.
 BUT--luckily my house is in remarkably great shape! There isn't major major structural damage, I'm only missing about 6ft. of piping, and it looks as though I have nice wood floors that just need a little TLC. I even have a wonderful set of pocket doors and a newly refinished bathroom! All in all, the house has 6 small bedrooms, two floors, two bathrooms, an attic, a basement, two kitchens, a porch to sit on, and a big backyard for my garden! Can't wait to start getting my hands dirty, learning the basics of housing rehab...
 I will say, though, there is one activity that is fun for everyone. Regardless if a person is young or old, silly or serious, I have yet to hear of a person who does not enjoy demolishing walls. One volunteer describes it as her "daily zen." The handling of a crowbar, hitting it with as much force as possible against the plaster walls relieves stress levels and erases worry lines. Perhaps instead of botox injections, the stereotypical trophy wife should look to this activity to keep the life in her aging face!


